Tutorial
Codex CLI with Xisu AI: set up the Responses API in one go
Install Codex CLI, add one config.toml and one environment variable to run on Xisu AI, plus how Responses differs from Chat Completions.
Codex CLI is OpenAI's open-source coding agent for the terminal: it reads your code, edits files and runs commands. It talks to models over the Responses API (/v1/responses), which Xisu AI serves as-is. Write the config file, set your key, and Codex CLI works directly, with no ChatGPT login.
Tested with Codex CLI 0.162.1. Model names are current as of 2026-10-16.
Quick version
- Install:
npm i -g @openai/codex- Add the Xisu AI settings to
~/.codex/config.toml(step 2)- Put your key in the
XISU_API_KEYenvironment variable, open a new terminal and runcodex
You need an API key first. If you don't have one yet, follow First steps: sign up, add funds, create a key. If you already set up the Codex desktop app, steps 2 and 3 are done: the CLI and the desktop app read the same config file and environment variable, so it works as soon as it's installed.
1. Install
The same command works on Windows, macOS and Linux. You need Node.js first (the LTS release is a good choice):
npm i -g @openai/codex
If npm is slow from mainland China, you can point this one install at a domestic mirror:
npm i -g @openai/codex --registry=https://registry.npmmirror.com
Check the install:
codex --version
Output like codex-cli 0.162.1 means it's installed (your version may be newer).
2. Write config.toml
The config file is .codex\config.toml in your home folder. Its content is identical to the desktop app's:
model_provider = "xisu"
model = "gpt-5.6-terra"

[model_providers.xisu]
name = "Xisu AI"
base_url = "https://api.xisu.ai/v1"
wire_api = "responses"
env_key = "XISU_API_KEY"
base_urlincludes/v1;wire_api = "responses"selects the Responses API;env_keynames the environment variable that holds your key.modelis the default model. Any name from the Models page works; recommendations are in step 5.- If the file already had content, put the first two lines at the very top and the
[model_providers.xisu]block at the end.
Windows: run these two lines in PowerShell. When Notepad asks whether to create a new file, click Yes, paste the content above and save:
New-Item -ItemType Directory -Force "$env:USERPROFILE\.codex" | Out-Null
notepad "$env:USERPROFILE\.codex\config.toml"
macOS / Linux: paste the whole block into a terminal:
mkdir -p ~/.codex
cat > ~/.codex/config.toml <<'EOF'
model_provider = "xisu"
model = "gpt-5.6-terra"

[model_providers.xisu]
name = "Xisu AI"
base_url = "https://api.xisu.ai/v1"
wire_api = "responses"
env_key = "XISU_API_KEY"
EOF
This uses >, which overwrites an existing config.toml. If yours already has content, merge by hand in an editor.
3. Store the key in an environment variable
The key goes into XISU_API_KEY instead of the config file, so the file can be shared without leaking the key.
Windows (PowerShell):
[Environment]::SetEnvironmentVariable("XISU_API_KEY", "paste-your-key-here", "User")
No output means it worked. Close the terminal and open a new one so it sees the variable.
macOS / Linux (bash users: replace ~/.zshrc with ~/.bashrc):
echo 'export XISU_API_KEY="your-key"' >> ~/.zshrc
source ~/.zshrc
4. Use it
Interactive mode
In your project folder, run:
cd your-project
codex
On first launch you may see:
- A new-model prompt such as "Meet GPT-6 Sol": Codex suggests a newer version of the model in your config (GPT-6 Sol for
gpt-5.6-terra, GPT-6 Luna forgpt-5.6-luna). Choose 2. Use existing model to keep the model from your config. Option 1 switches to the suggested model, which we also offer, with different usage and cost. - "Update available": if Codex offers an update, choose Skip to continue and upgrade later on your own.
- Sandbox setup on Windows: Codex sets up its sandbox first ("Setting up sandbox"). If you see "Couldn't set up your sandbox with Administrator permissions", choose 2. Use Codex with non-admin sandbox. Codex then writes
sandbox = "unelevated"under[windows]in config.toml.
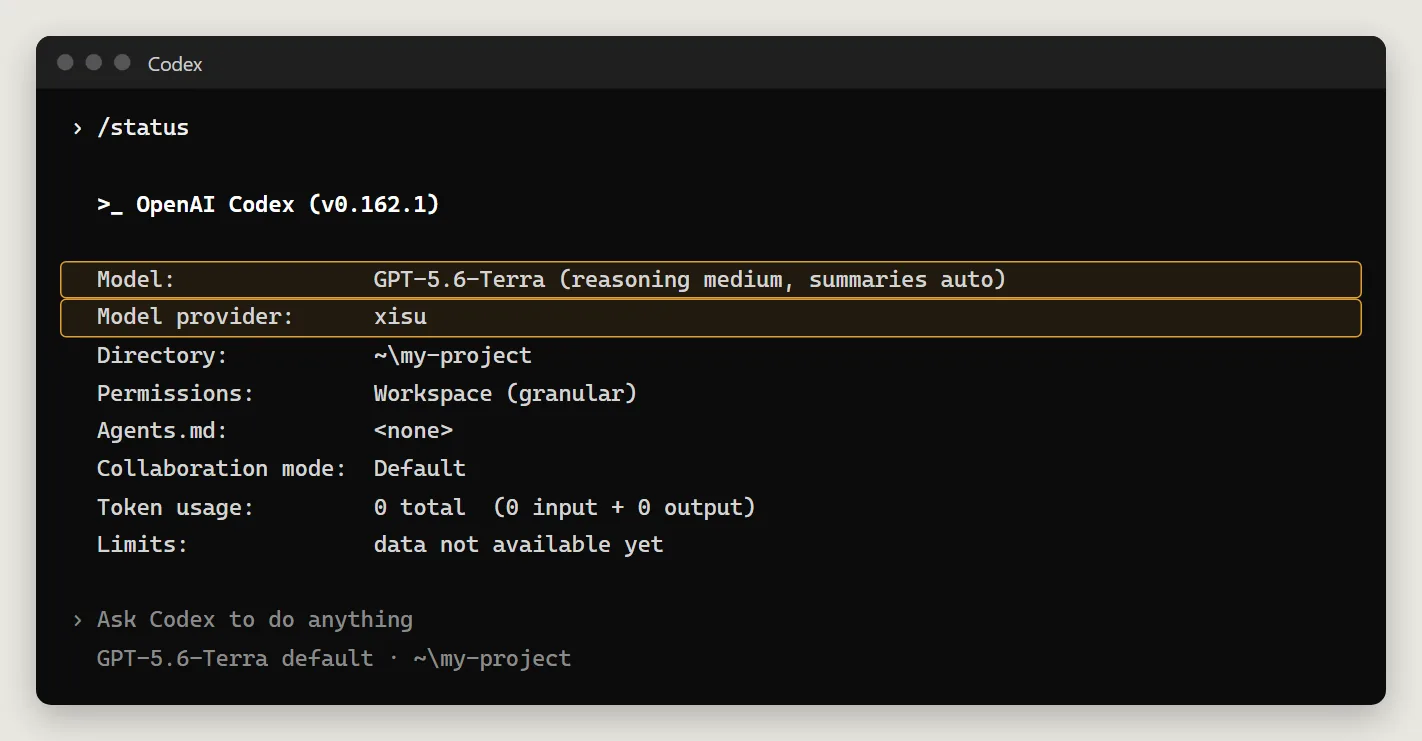
Type /status and press Enter. Model provider: xisu means you're going through Xisu AI.
Non-interactive mode: codex exec
codex exec runs one task and exits, which suits scripts and automation:
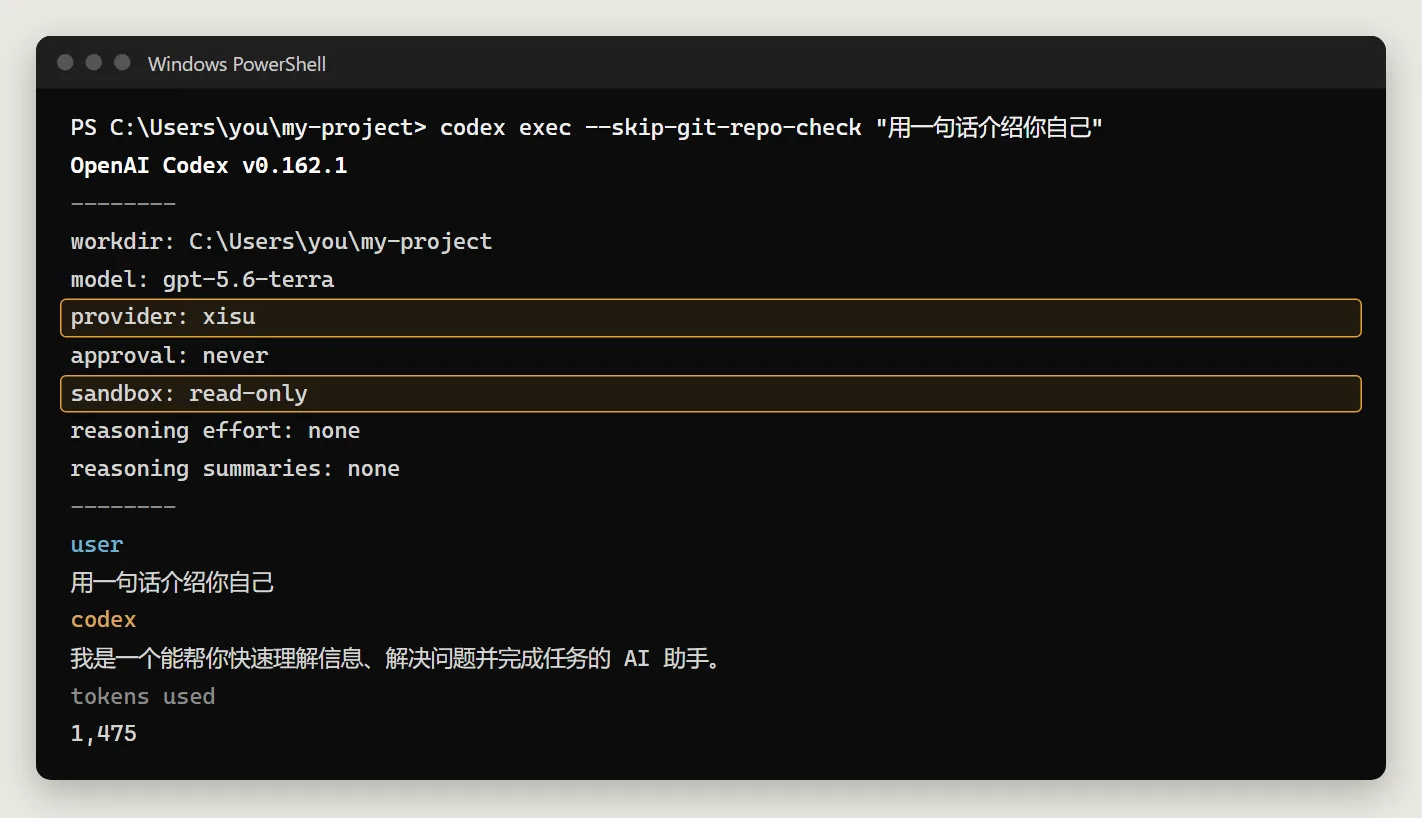
codex exec "Describe this project in one sentence"
The header lists the settings for the run; check for provider: xisu:
model: gpt-5.6-terra
provider: xisu
approval: never
sandbox: read-only
Things to know:
- The sandbox is read-only by default (
sandbox: read-only). Asking it to change files fails withwriting is blocked by read-only sandboxand nothing is written. - To let it write, add
--sandbox workspace-write(short form-s workspace-write), which allows changes inside the current folder:
codex exec -s workspace-write "Create hello.txt containing hi"
- On Windows the sandbox also has to be set up, or the header still says
sandbox: read-onlyeven with-s workspace-write. Completing the sandbox setup once in interactive mode is enough, or add this to the end of config.toml:
[windows]
sandbox = "unelevated"
--full-autofrom older guides is gone in 0.162.1 and fails withunexpected argument '--full-auto' found. Use-s workspace-writeinstead.- Outside a Git repository you get
Not inside a trusted directory and --skip-git-repo-check was not specified.Add--skip-git-repo-check. - Use
-mto switch models for one run, for examplecodex exec -m gpt-5.6-luna "…". - WARN lines in the output (such as a 401 from a chatgpt.com plugin endpoint) come from Codex's own feature checks and have nothing to do with Xisu AI. You can ignore them.
A simple codex exec task uses about 10,000 input tokens, most of them served from cache at the cache rate. Every call is listed in the console's Request log.
5. Choose a model
As of 2026-10-16, we tested these models over the Responses API:
| Use | Model |
|---|---|
| Everyday coding (default) | gpt-5.6-terra |
| Harder tasks | gpt-6-sol, gpt-6.1-sol, gpt-5.6-sol |
| Simple tasks, lowest cost | gpt-6-luna, gpt-5.6-luna |
Codex works best with GPT models. Prices are on the Models page.
To switch: change model in config.toml, pass -m model-name at launch, or type /model in interactive mode.
6. How Responses differs from Chat Completions
The OpenAI-compatible address serves two chat APIs. Codex uses /v1/responses; most clients, such as Cherry Studio and Chatbox, use /v1/chat/completions. Both use the same key and the same balance. They differ in request and response shape:
/v1/chat/completions |
/v1/responses |
|
|---|---|---|
| Conversation | messages (array of messages) |
input (a string or an array of messages) |
| System prompt | a role: "system" message in messages |
the instructions field |
| Output length cap | max_tokens |
max_output_tokens |
| Reading the answer | choices[0].message.content |
the type: "message" item in output; in the SDK, just output_text |
| Usage fields | usage.prompt_tokens / usage.completion_tokens |
usage.input_tokens / usage.output_tokens |
| Cache hits | usage.prompt_tokens_details.cached_tokens |
usage.input_tokens_details.cached_tokens |
| Streaming format | data: {…} chunks; read choices[0].delta.content; ends with data: [DONE] |
named events with event:; read response.output_text.delta; ends with response.completed, no [DONE] |
| Streaming usage | usage in the last data chunk |
once, in the response.completed event |
| Multi-turn | send the full messages every time |
send the full input every time; previous_response_id is not supported |
The same request both ways: curl
Chat Completions:
curl https://api.xisu.ai/v1/chat/completions \
  -H "Authorization: Bearer $XISU_API_KEY" \
  -H "Content-Type: application/json" \
  -d '{
    "model": "gpt-5.6-luna",
    "messages": [
      {"role": "system", "content": "You are a concise assistant"},
      {"role": "user", "content": "Explain what an API is in one sentence"}
    ],
    "max_tokens": 200
  }'
Response (trimmed):
{
  "object": "chat.completion",
  "model": "gpt-5.6-luna",
  "choices": [
    {"message": {"role": "assistant", "content": "An API (Application Programming Interface) is a set of rules that lets different software applications communicate and share functionality."}, "finish_reason": "stop"}
  ],
  "usage": {"prompt_tokens": 319, "completion_tokens": 26, "total_tokens": 345}
}
Responses:
curl https://api.xisu.ai/v1/responses \
  -H "Authorization: Bearer $XISU_API_KEY" \
  -H "Content-Type: application/json" \
  -d '{
    "model": "gpt-5.6-luna",
    "instructions": "You are a concise assistant",
    "input": "Explain what an API is in one sentence",
    "max_output_tokens": 200
  }'
Response (trimmed):
{
  "object": "response",
  "status": "completed",
  "model": "gpt-5.6-luna",
  "output": [
    {"type": "message", "role": "assistant", "content": [{"type": "output_text", "text": "An API (Application Programming Interface) is a set of rules that lets different software applications communicate and exchange data."}]}
  ],
  "usage": {"input_tokens": 319, "output_tokens": 26, "total_tokens": 345}
}
These curl commands are for macOS / Linux terminals, or Git Bash / WSL on Windows.
The same request both ways: Python
Install the SDK first: pip install openai.
import os
from openai import OpenAI

client = OpenAI(api_key=os.environ["XISU_API_KEY"], base_url="https://api.xisu.ai/v1")

# Chat Completions: the conversation goes in messages
chat = client.chat.completions.create(
    model="gpt-5.6-luna",
    messages=[
        {"role": "system", "content": "You are a concise assistant"},
        {"role": "user", "content": "Explain what an API is in one sentence"},
    ],
    max_tokens=200,
)
print(chat.choices[0].message.content)
print(chat.usage.prompt_tokens, chat.usage.completion_tokens)

# Responses: system prompt in instructions, user input in input
resp = client.responses.create(
    model="gpt-5.6-luna",
    instructions="You are a concise assistant",
    input="Explain what an API is in one sentence",
    max_output_tokens=200,
)
print(resp.output_text)
print(resp.usage.input_tokens, resp.usage.output_tokens)
Streaming differences
import os
from openai import OpenAI

client = OpenAI(api_key=os.environ["XISU_API_KEY"], base_url="https://api.xisu.ai/v1")

# Chat Completions streaming: read choices[0].delta.content; the last chunk carries usage
stream = client.chat.completions.create(
    model="gpt-5.6-luna",
    messages=[{"role": "user", "content": "Count to 3"}],
    stream=True,
)
for chunk in stream:
    if chunk.choices and chunk.choices[0].delta.content:
        print(chunk.choices[0].delta.content, end="", flush=True)
    if chunk.usage:
        print("\nusage:", chunk.usage.prompt_tokens, chunk.usage.completion_tokens)

# Responses streaming: handle events by type; usage only arrives in response.completed
stream = client.responses.create(model="gpt-5.6-luna", input="Count to 3", stream=True)
for event in stream:
    if event.type == "response.output_text.delta":
        print(event.delta, end="", flush=True)
    elif event.type == "response.completed":
        u = event.response.usage
        print("\nusage:", u.input_tokens, u.output_tokens)
A raw Chat Completions stream looks roughly like this (some fields omitted) and ends with [DONE]:
data: {"object":"chat.completion.chunk","choices":[{"delta":{"content":"1"}}]}
...
data: {"object":"chat.completion.chunk","choices":[{"delta":{},"finish_reason":"stop"}],"usage":{"prompt_tokens":305,"completion_tokens":9,"total_tokens":314}}
data: [DONE]
A Responses stream is a sequence of named events:
response.created → response.in_progress → response.output_item.added → response.content_part.added
→ response.output_text.delta (many) → response.output_text.done → response.content_part.done
→ response.output_item.done → response.completed
Other event types (such as response.metadata) may appear in between; handle the type values you care about and skip the rest. Treat response.completed as the end, and don't wait for [DONE].
Multi-turn conversations
Xisu AI doesn't store conversations on the server, so for multi-turn Responses calls you send the history yourself:
import os
from openai import OpenAI

client = OpenAI(api_key=os.environ["XISU_API_KEY"], base_url="https://api.xisu.ai/v1")

# Multi-turn: no previous_response_id, send the whole history in input
history = [
    {"role": "user", "content": "My name is Lin"},
    {"role": "assistant", "content": "Hi, Lin!"},
    {"role": "user", "content": "What is my name?"},
]
resp = client.responses.create(model="gpt-5.6-luna", input=history, max_output_tokens=100)
print(resp.output_text)
Three unsupported fields
These fields depend on server-side storage and return 400 instead of being silently ignored:
| Field | Error returned | What to do |
|---|---|---|
previous_response_id |
'previous_response_id' is not supported on this gateway … |
Put the full conversation in input |
background |
'background' is not supported on this gateway … |
Use a normal or streaming request |
store: true |
'store: true' is not supported on this gateway … |
Set it to false or leave it out |
Codex CLI doesn't rely on any of them, so normal use is unaffected. The full Responses reference (per-call billing for server tools, 404 vs 503 and more) is in OpenAI Responses endpoint.
Troubleshooting
Missing environment variable: XISU_API_KEY: the variable isn't set, or you didn't open a new terminal afterwards. Redo step 3 and open a new terminal.
Reconnecting... 2/5 repeats, then 401 Unauthorized: invalid API key: the key is wrong. Check that it's complete with no extra spaces, or that it hasn't been revoked; if it has, create a new one.
Files aren't written, "read-only sandbox": codex exec is read-only by default. Add -s workspace-write, and on Windows set up the sandbox as in step 4.
--full-auto gives "unexpected argument": the flag was removed in 0.162.1. Use -s workspace-write.
Model not found or unavailable: set model to a model listed on the Models page. A 404 model_not_on_endpoint means that model can't use the Responses API, so pick another; a 503 means no capacity right now, so retry a little later.
Switching back to your OpenAI account: delete the line model_provider = "xisu" from config.toml.
The desktop app: works with exactly the same setup; see the Codex desktop guide. For other clients, see Xisu AI clients: downloads and setup.