Quickstart
Connect to the Xisu AI API in 5 minutes: Python, Node.js and curl
Sign up, add funds, create a key, set base_url, send your first request in Python, Node.js or curl, then check tokens and cost in Request log.
To use Xisu AI you need two things: an API key and a base_url. Any OpenAI-compatible SDK or tool works once you swap those two in — no other code changes.
Shortest path:
- Sign up and add funds (¥10 is a good start)
- Create a key under API keys in the console
- Set base_url to
https://api.xisu.ai/v1 - Send your first request with any snippet below
Every snippet on this page was run against the live API with a real key (as of 2026-10-16). They all use gpt-6-luna, currently the lowest-priced model and a good fit for getting the pipeline working; to use another model, change model.
1. Sign up
Open the sign-up page, register with your email, and click the verification link in your inbox. If a new-user bonus is running, it lands in your balance once you verify (see the promotion page for terms). For a step-by-step with screenshots, see Sign up, add funds, create a key.
2. Add funds (start with ¥10)
Log in to the console, open Billing center in the left sidebar, choose ¥10.00 and click Top up now. Alipay and WeChat Pay are supported.
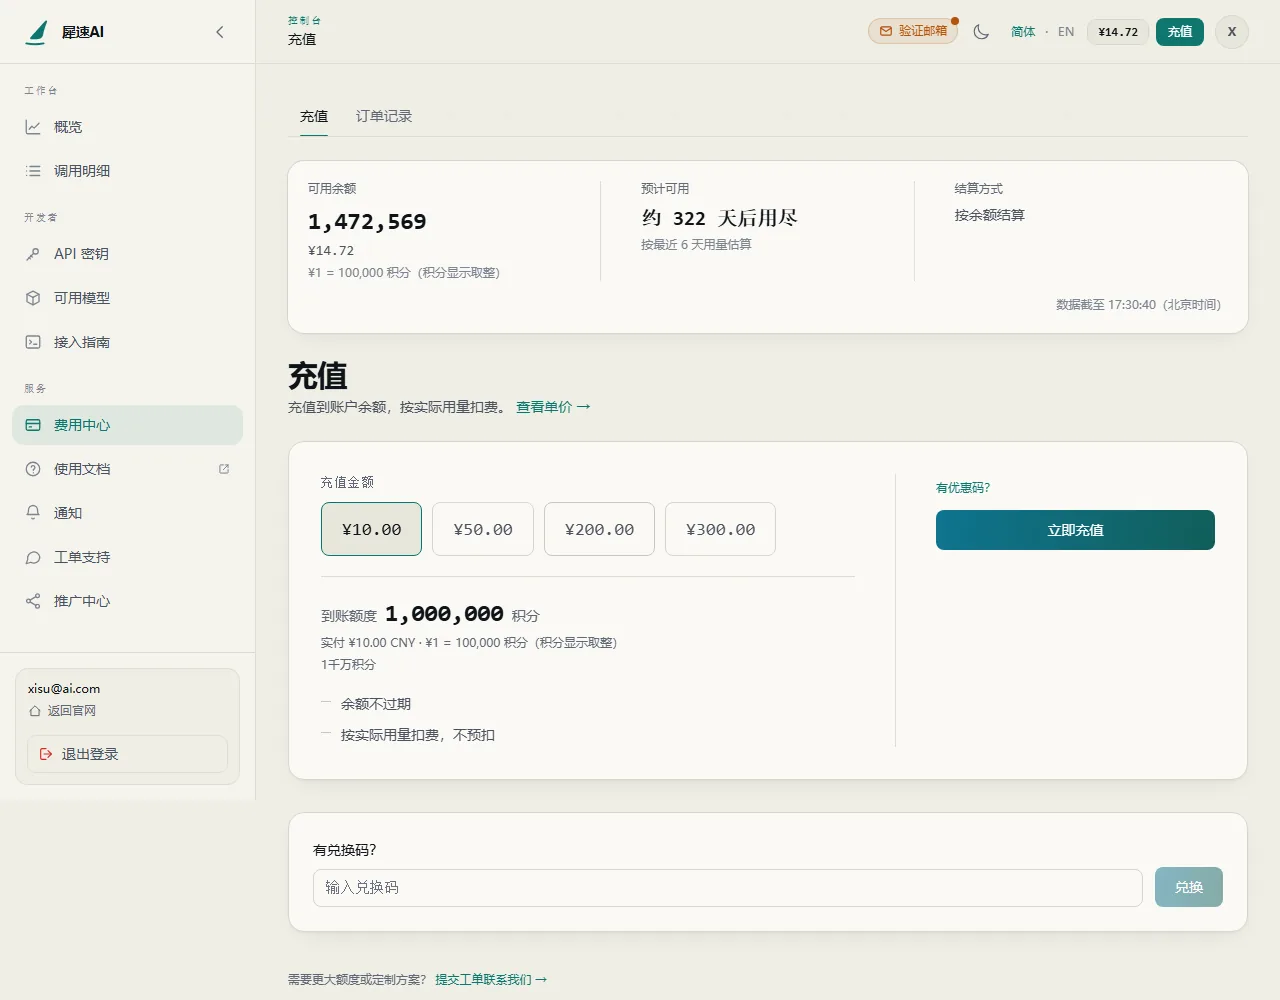
- The console shows amounts in credits: ¥1 = 100,000 credits, so ¥10 is 1,000,000 credits.
- Your balance does not expire. Each call is charged for what it actually used once it finishes; nothing is held in advance.
- Prepaid only — once the balance reaches zero, new requests are refused. Refund rules: Top-ups and refunds.
3. Create an API key
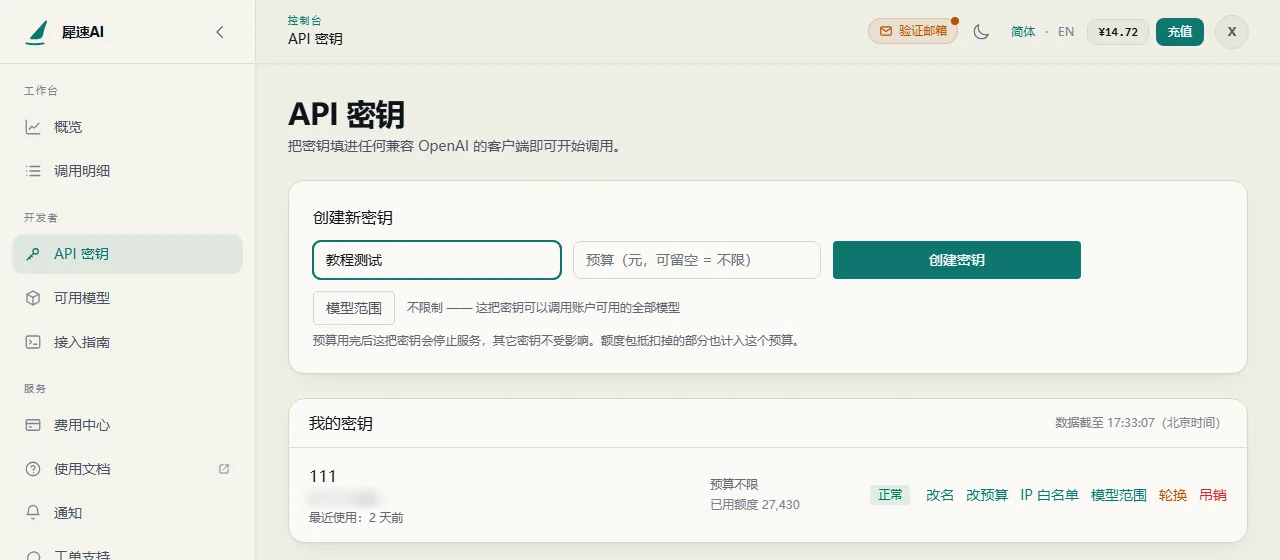
Open API keys in the sidebar, give the key a name (for example "local test") and click Create key. Budget, IP allowlist and model allowlist can stay empty for now; see Key security and rotation when you need them.
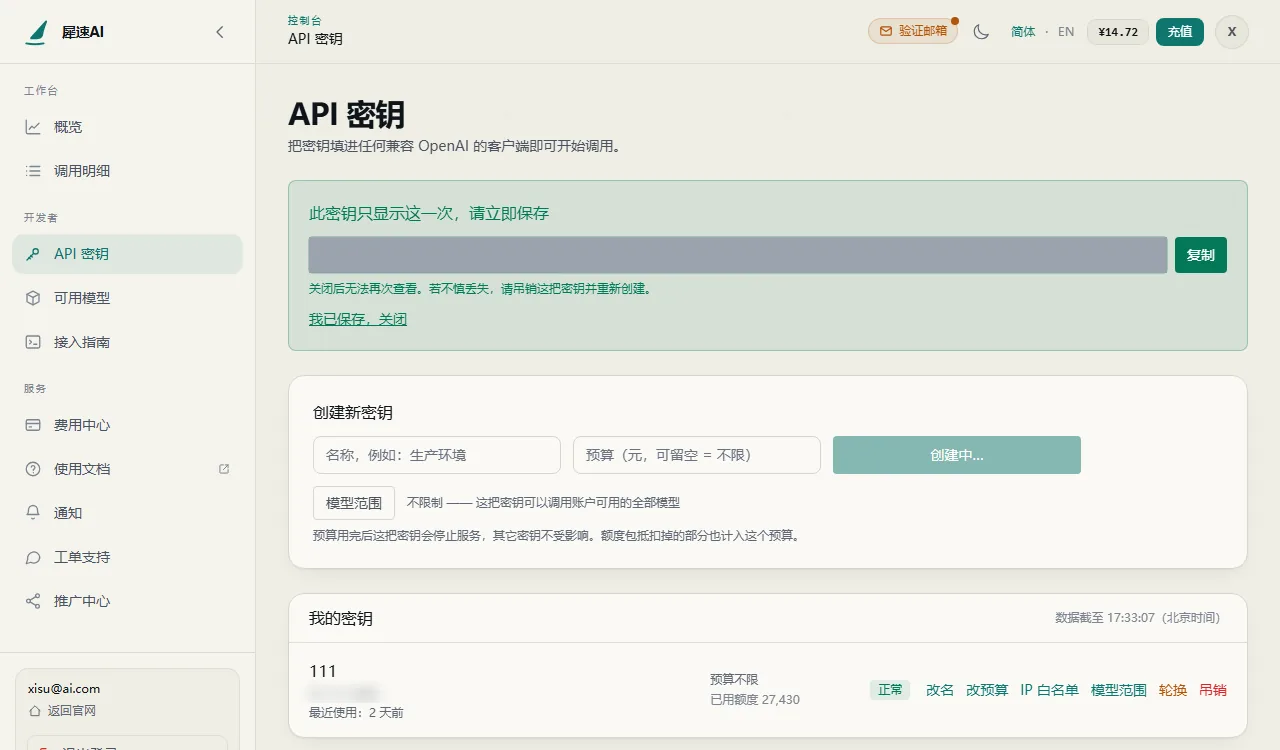
The full key is shown exactly once. The server stores only a hash, so nobody can recover it after you close the page. Copy it right away; if you lose it, revoke it and create a new one.
To keep the key out of your code, every example below reads it from the XISU_API_KEY environment variable. Set it in the terminal where you run the code:
# Windows PowerShell
$env:XISU_API_KEY = "sk-your-key"
# macOS / Linux
export XISU_API_KEY="sk-your-key"
4. Set base_url
https://api.xisu.ai/v1Keep the trailing /v1; without it you get 404 Not Found. The Anthropic SDK and Claude Code use the address without /v1 — see What is Xisu AI.
5. Send your first request
Python
pip install openai
import os
from openai import OpenAI

client = OpenAI(
    api_key=os.environ["XISU_API_KEY"],      # read from the environment; never hard-code keys
    base_url="https://api.xisu.ai/v1",
)

resp = client.chat.completions.create(
    model="gpt-6-luna",
    messages=[{"role": "user", "content": "Introduce yourself in one sentence"}],
)
print(resp.choices[0].message.content)
print(resp.usage)
The output looks like:
I’m ChatGPT, an AI assistant that helps answer questions, explain ideas, and create useful content.
CompletionUsage(completion_tokens=25, prompt_tokens=307, total_tokens=332, ...)
Node.js
Node.js 18+ has fetch built in, so no packages are needed. Save this as hello.mjs and run node hello.mjs:
const resp = await fetch("https://api.xisu.ai/v1/chat/completions", {
  method: "POST",
  headers: {
    "Content-Type": "application/json",
    Authorization: `Bearer ${process.env.XISU_API_KEY}`,
  },
  body: JSON.stringify({
    model: "gpt-6-luna",
    messages: [{ role: "user", content: "Introduce yourself in one sentence" }],
  }),
});

const data = await resp.json();
if (!resp.ok) throw new Error(JSON.stringify(data.error));
console.log(data.choices[0].message.content);
console.log("x-request-id:", resp.headers.get("x-request-id"));
console.log("usage:", data.usage);
To use the official SDK instead, run npm i openai first:
import OpenAI from "openai";

const client = new OpenAI({
  apiKey: process.env.XISU_API_KEY,
  baseURL: "https://api.xisu.ai/v1",
});

const resp = await client.chat.completions.create({
  model: "gpt-6-luna",
  messages: [{ role: "user", content: "Introduce yourself in one sentence" }],
});
console.log(resp.choices[0].message.content);
console.log(resp.usage);
curl
macOS / Linux terminal (or Git Bash):
curl https://api.xisu.ai/v1/chat/completions \
  -H "Content-Type: application/json" \
  -H "Authorization: Bearer $XISU_API_KEY" \
  -d '{"model":"gpt-6-luna","messages":[{"role":"user","content":"Hello"}]}'
In the returned JSON, choices[0].message.content is the reply and usage is the token count for this call.
Quoting JSON for curl in Windows PowerShell is error-prone, so use this instead (tested on the built-in Windows PowerShell 5.1):
$body = @{
  model    = "gpt-6-luna"
  messages = @(@{ role = "user"; content = "Introduce yourself in one sentence" })
} | ConvertTo-Json -Depth 5

$resp = Invoke-WebRequest -Uri "https://api.xisu.ai/v1/chat/completions" -Method Post -UseBasicParsing `
  -Headers @{ Authorization = "Bearer $env:XISU_API_KEY" } `
  -ContentType "application/json; charset=utf-8" `
  -Body ([Text.Encoding]::UTF8.GetBytes($body))

$data = [Text.Encoding]::UTF8.GetString($resp.RawContentStream.ToArray()) | ConvertFrom-Json
$data.choices[0].message.content
"x-request-id: " + $resp.Headers["x-request-id"]
Streaming
Add stream=True and the reply arrives piece by piece, which suits chat UIs that render as text is generated:
import os
from openai import OpenAI

client = OpenAI(api_key=os.environ["XISU_API_KEY"], base_url="https://api.xisu.ai/v1")

stream = client.chat.completions.create(
    model="gpt-6-luna",
    messages=[{"role": "user", "content": "Write a three-line poem about autumn"}],
    stream=True,
)
for chunk in stream:
    if chunk.choices and chunk.choices[0].delta.content:
        print(chunk.choices[0].delta.content, end="", flush=True)
    if chunk.usage:                       # last chunk: empty choices, usage only
        print("\n\nusage:", chunk.usage)
Streaming responses always end with an extra usage chunk whose choices array is empty. If you parse SSE yourself, don't assume every chunk has choices[0]; see API compatibility and parameters. If a stream is cut off midway, the tokens already generated are billed.
6. Find the call in Request log
After a successful call, open Request log in the console sidebar and you will see it. Each row shows:
| Column | Meaning |
|---|---|
| Time | When the request happened |
| Request ID | The request_id of this call |
| Model / key | The model called and which key was used (prefix shown) |
| Tokens | Broken down: input (of which cache hits), output (of which reasoning), cache writes, total |
| Duration | How long the call took |
| Cost | Credits charged for this call |
| Status | Success / failed / client disconnected / upstream error / not billed |
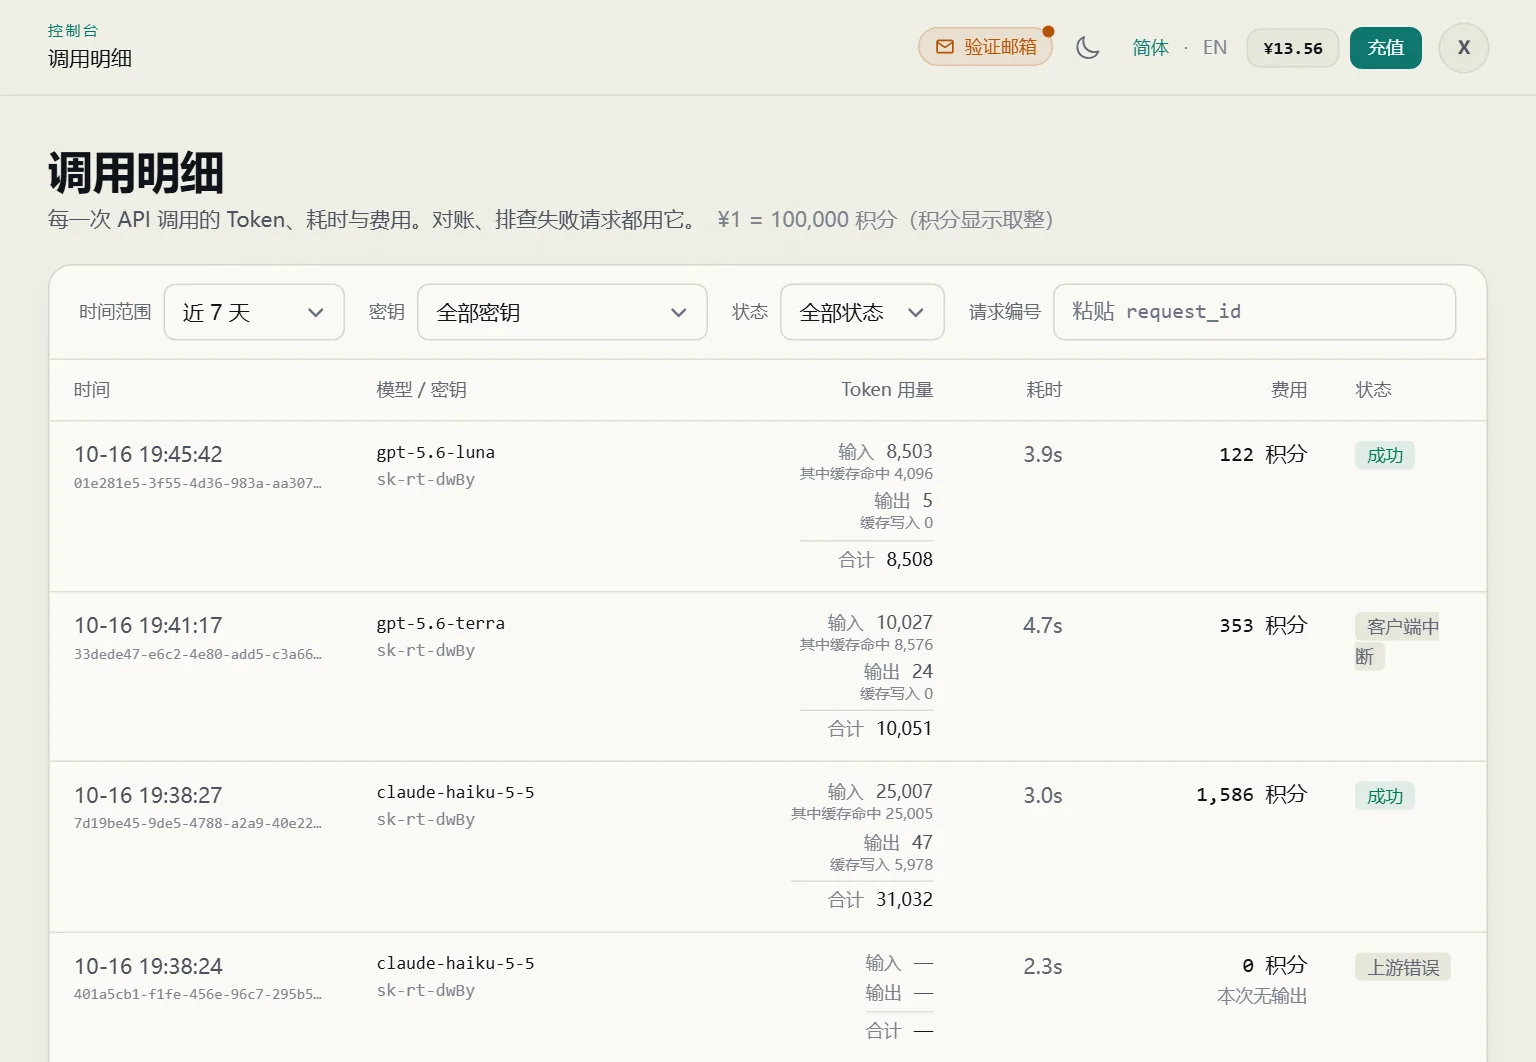
You can filter by time range, key, status and request ID. Failed requests are listed too, with the cost shown as "0 credits, no output" — they are not charged. The page shows a "data as of" time; a call you just made may take a moment to appear.
7. Reconcile with x-request-id and usage
Every response carries an x-request-id header, and usage in the body holds that call's token counts. Log both and you can match any call against the console:
import os
from openai import OpenAI

client = OpenAI(api_key=os.environ["XISU_API_KEY"], base_url="https://api.xisu.ai/v1")

raw = client.chat.completions.with_raw_response.create(
    model="gpt-6-luna",
    messages=[{"role": "user", "content": "1+1=?"}],
)
resp = raw.parse()
print("x-request-id:", raw.headers.get("x-request-id"))
print("prompt_tokens:", resp.usage.prompt_tokens)
print("completion_tokens:", resp.usage.completion_tokens)
print("total_tokens:", resp.usage.total_tokens)
The output looks like:
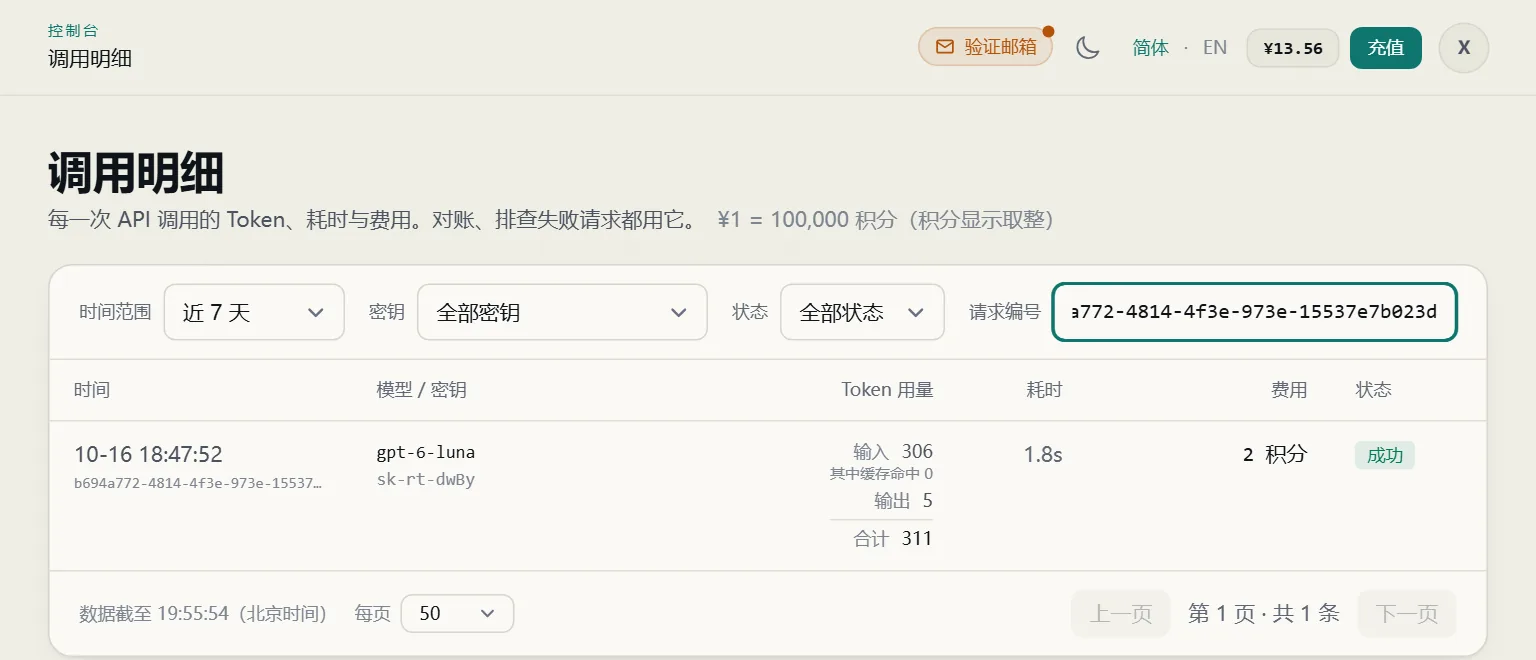
x-request-id: b694a772-4814-4f3e-973e-15537e7b023d
prompt_tokens: 306
completion_tokens: 5
total_tokens: 311
Reconciling takes three steps:
- In Request log, filter by Request ID using the
x-request-idvalue to find the call. - Check tokens: input and output in the console should match
prompt_tokensandcompletion_tokensinusage;usage.prompt_tokens_details.cached_tokensis "of which cache hits" andusage.completion_tokens_details.reasoning_tokensis "of which reasoning". - Check cost: the console's Input already includes incl. cache hits, so cost = (input − cache hits) × input price + cache hits × cache-read price + cache writes × cache-write price + output × output price. Prices are listed on the model catalog in credits per 1M tokens; reasoning tokens are charged at the output price. Divide credits by 100,000 to get yuan — 3,370 credits in the console is ¥0.0337.
For more, including why a cost can show as 0, see Reconciling usage and bills.
Common errors
| What you see | Cause | Fix |
|---|---|---|
401 invalid_api_key |
Wrong or revoked key, or your source IP is not on the key's allowlist | Check the key in your environment variable; if the key has an IP allowlist, confirm your source IP |
400 model_not_found |
Misspelled or retired model name | Copy the exact name from the model catalog |
404 Not Found |
base_url is missing /v1 |
Use https://api.xisu.ai/v1 |
insufficient_balance |
Not enough balance for this call | Top up under Billing center. On the Anthropic-native endpoint, low balance is reported as 429 rate_limit_error |
All error codes: Error codes and rate limits. When reporting a problem, include the x-request-id, the time, the model and the full error response.
Next steps
- Pick a model: How to choose a model
- Use it in Claude Code: Claude Code setup
- Use it in Codex CLI: Codex CLI setup
- Chat in a desktop client: Client downloads and setup
- Timeouts and retries before going live: Before production: timeouts, retries and tool calls